")
Here is a 30 minute video from The Dice Treasures that explains how Rogue Angels works… the action cards, the dice, the movement, range, line of sight, interaction, damage cards, healing and most of all … with the enemies :)
You can watch the full video here, but also (if you are like me) you will find a text article below the video window that provides the same information including time stamps to where the information is in the video (along with some added information that I might add as I go through the video with you)!
The Dice Treasures obviously spent HOURS preparing for this video (not to mention the hours spent learning the game). In my first few games that I played I discovered that I was making several “obvious” mistakes (they just weren’t obvious to me at the time). Plus in my games I kept forgetting to move the turn marker as well as forgetting which players had taken their turns (I forgot to flip the active tokens). So, as I am learning this game, I was excited to see this extremely detailed How To Play. In case others are using this video to explain the game flow, I am including notes about things that seem to have been forgotten (just like I forgot so many things)… but it just seems that forgetting is part of the game when we are starting it :)
If you are here to Learn With Me, then I will include a note where something was forgotten or misstated (I double checked with the game developer)
Video first (text with my added tidbits below it):
- 0:38 – Start a Mission. Begin each mission with the Mission Layout in the Campaign book (which follows the Mission Brief)

For information about the various components and how they are setup, watch the previous excellenty video which explains them:
=> Detailed Components and Setup (text and video)
- 0:50 – Important Note: each time you finish a Map Layout, the enemy takes it’s turn FIRST! However, there are exceptions to this, and Mission C3A (the example used in this video) is one of the exceptions because the enemy is not moving at all yet. This example will have a minimal size and only use two heroes, Gia and Memnon. No Enemy Behavior Card has been assigned yet. Our heroes are grouped into two teams. The enemy will only start moving (red first) when a hero interacts with something on the board (and will target that hero’s team).
- 1:21 – Mission Objective: Disable the console (which is in a room with two locked doors) in 9 turns. We must interact with a door and then with the console. As soon as we interact with something, the enemy will react and we pull out the Chaotic Attack Enemy Behavior Card (starting with the red enemy).
- 2:03 – Let’s Start. Let’s start with something simple and look at what a player can do on their turn. They can perform up to 2 actions from these three possible actions. These can be in any sequence and order as you wish (you can even skip your turn if you wish):
- 2:25 – Play an Action Card.
- 2:35 – Concentrate. Gain two focus points (slide the focus token up two spots on the focus track)
- 2:44 – Rest. All cards on the cool down track slide one spot to the left. Action cards sliding off the left side are returned to your hand.
- 2:50 – First Turn Example. For Gia he chose to play Action Card: Tactical Positioning to move 3 squares (plus 1 die roll). He rolls a 1 and moves 4. His final action he plays Action Card: Basic Move to move 1 square (plus 1 die roll). His turn ends. Flip the activate token over. All cards move 1 spot to the left on the cool down track (free rest at end of turn). [He forgot to slide the red turn marker over 1 spot to the 8 – I tend to forget sliding that turn marker myself and came up with a trick to help me remember (see end of this article)].
- 5:59 – Barrel of Fun. He explains that shooting a fuel barrel will cause an explosion that deals 4 damage to anything within 2 squares (limited by walls). Anyone within 2 squares of an exploding barrel will get 4 damage.
- 6:41 – Second Turn Example. For Memnon he talks about Line Of Sight needed in order to shoot a fuel barrel. Memnon can only see one barrel. The wall blocks his Line Of Sight to the other barrel. To have Line Of Sight you must be able to connect the small center dot in the start and end squares. So he chooses to do a Basic Move for the first action and rolls the die getting a 2 move result. He moves Memnon 3 squares. The second action will be to play Action Card K90 CC Gun (deal 1 damage within 7 squares plus 2 dice). He rolls a +1 and a +1/Move. He chooses to use the move (which can be before or after his attack shot). [He does not use the +1 on the other die]. [He also does not use the 1 Move he rolled – but Memnon WAS moved one in the next phase of the video, so he performed the move off camera]. This turn is over. Flip the activate token over. All cards slide one slot to the left (free rest at end of turn). Slide the turn token one to the right to the 8 [actually should be on 7]. Since both players have had their turns, both activation tokens now should be reset to active (as seen at 14:35 time stamp).
- 10:44 – Red Enemy: Chaotic Attack. There is only 1 red enemy. Even though it is marked as initiative number 2, it is NOT the 2nd lowest initiative now because red enemy 1 has been removed from the game. So it will follow the top section as the lowest initiative red enemy, and it first moves 1 to the left and 1 diagonal down [following Enemy Standard 1 on page 36 of the rulebook] which puts him within range and Line Of Sight of Memnon. Now that red enemy continues on with the behavior listed in the top line:

The enemy’s 2nd behavior will be to attack the nearest player. It now is within 1 square of range and Line Of Sight of both Memnon (above to the left) and Gia (directly below). [checked with the developer on this! An enemy’s first priority is explained on page 36 of the rulebook: they consider a diagonal range as longer than a straight range. Thus Gia should be the “nearest” player regarding range for attack since Memnon is at a diagonal (and thus considered longer).] In the video, Memnon thus is hit with 3 damage, but does have 3 shields, so they deflect all incoming damage [and Memnon should end with 0 shields] [note: Memnon is the only hero with a “permanent” shield. He starts with one permanent shield and two normal shields. Using three shields to deflect 3 damage should end with zero shields – game developer confirmed this]. Enemy’s turn is completed. - 14:35 – It is now the players turn. Since both have completed their first turn, either can go first at this point. He chooses to have Gia take her turn now. Gia is 2 away from the door, thus the Basic Interact card will not allow access to the door. However, Gia will play the Infiltration Units Action Card which allows interaction for two objects [for 2] within range of 2 with one die (played on cool down track spot 3). He rolls +1 giving him an interaction of 3 [2+1].
- 15:42 – Interaction with the door (as Gia’s first action). All interactions are done via interaction tokens that are in a black bag (so you cannot see them as you draw them out one by one). You must get 3 tokens of the same color to succeed in an interaction. White tokens are considered “wild”. In this example, he actually DID randomly draw 3 purple tokens in a row and succeeded in opening the door. If he had drawn tokens of different colors, he would have to choose ONE color and keep that color next to the door and replace all other tokens that were not wild or that color back into the black bag. [note: the three tokens that successfully interacted with the door should be set aside off the game board map and placed next to the black bag (but not IN the black bag)]
- 18:21 – Gia’s 2nd Action: Gia’s focus is down 3 spots, so use the action CONCENTRATE to bump up the focus by 2. Turn is over, flip activation token over. Perform free rest action to slide all cards one spot to the left. [The Tactical Positioning card slid off the cooldown track back into the players hand]. [Note: he forgot to slide turn counter token one spot to the right to 7 (but actually should be at 6 now). I share my trick on how to remember to do this at the end of this article:)]
- 18:45 – Enemy’s turn. [He forgot to give the yellow enemy their turn – the enemy gets their turn after every player’s turn, not just after all the players have taken their turns]
- 18:45 – Memnon taking a turn. Here is the layout of the map so you can see how Memnon cannot walk “through” the other two characters:

In the video, he explains the paths that Memnon can take. Then he explains how to use the Rush Action Card (that needs to go into cooldown slot 2). Since there already is a card in slot 2, if the card is played, it must go in a higher numbered slot (ie, 3) OR he must use a REST Action to slide the card to the right before playing the new card. He chose for the first action to play the card into slot 3 and rolled the 1 die with result +1/Move (which will add 1 to his movement so Memnon will move 4 [3+1]. - 20:36 – Memnon’s 2nd Action: Plays the Hacking Device Action Card which should go into slot 3, but there is a card there, so it goes into slot 4. This lets Memnon interact with an object within range of 4 for [3] (plus 1 die). The console is only range 3 so it is within range. He rolls the die result +1/Move. He chooses to use the +1 to gain one more interaction token. He draws 4 interact tokens: 2 red, 2 yellow. He chooses to leave the 2 yellow tokens next to the console and puts the 2 red tokens back into the black bag. He also explains (as a side note) how drawing 2 white tokens would cancel the interaction and all tokens drawn during that action would go back into the black bag. Turn over. Flip active token to not active. Slide all cards 1 slot to the left (he forgot to do this). Slide turn marker one spot to the right to 7 (actually should be at 5 now due to 2 missed slides).
- 22:50 – Enemy’s Turn. Since Red went last, it is the Yellow Enemy’s turn.

[Len checked with the developer. The enemy does not have the ability to go through closed doors (see rulebook page 34 2nd asterisk from the bottom). And thus the nearest player should be Gia.] Example in the video has yellow enemy Y1 move towards Memnon (as the nearest player), through the closed door into the room. Next Y1 enemy is to damage all players, however no player is within it’s range and Line Of Sight. Next the Y2 enemy has this behavior:
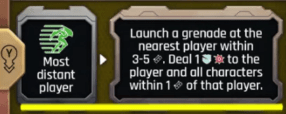
First Y2 moves towards the most distant player (Gia). Then it launches a grenade at Memnon dealing 1 unblockable damage (ie, shields will not deflect it). Draw one damage card for Memnon: Severe Shock (goes to slot 3). Since there already is an Action Card in slot 3, that card goes back into the player’s hand. Then he gave a side note that if a damage card had been in slot 3, then he would have had to play the new damage card into slot 4 and become unconscious. [Len’s note: page 40 of the rulebook notes that it is OK to place that damage card in slot 4 without becoming unconscious. The hero become unconscious only if you need to place a damage card into slot 4 and there already is a damage card there.] He then explains the next two sections on the damage card (“ongoing” for HARD mode and “when discarded” for INSANE mode”). He recommends playing at INSANE mode to get a better flavor of the game [However, note that Len is playing at the standard mode to not get too stressed out] - 30:18 – Unconscious. For the sake of a tutorial, let’s change this so that Memnon becomes unconscious. While Memnon is unconscious, that square is “occupied”. Other characters could not move through that square. Next, what can we do for this unconscious hero? We could move the other hero to be adjacent to the unconscious Memnon. Then we could use the Basic Interaction card to “heal” Memnon (ie, no longer unconscious) by removing one of the damage cards.
Trick to remember to slide the Turn Marker at the end of a hero’s turn
I write a very small note and place it on the character sheet for the hero who goes first, noting where the turn marker was at the start of their turn. After all players take their turns, you can look at that note to calculate where the turn marker SHOULD be… ie, just subtract the number of players.


Leave a comment