Questions Answered plus Clarifications
- Q: If two heroes are an equal number of squares away from an enemy, which enemy is considered “nearest”?
A: In counting the squares, enemies consider diagonal as “longer” than direct (edge to edge), so the distance with the least diagonals would be the nearest. Then if still an equal distance, the last activated hero is targeted. If still equal, then the tie breaker is the last activated. Ref: rulebook page 36 Priorities 1 - Q: What is the most dice a player might roll?
A: The most dice given for an Action Card is Four (though there is a rare case that five dice could be rolled using a special ability) - Q: For the 16 heroes in the game, will they be provided as both standees and miniatures?
A: Yes. You can use either and swap between them at any time. - Q: Clarify hero character Hiro Matsuo special ability
A: When playing either Basic Move or Basic Interact, his special ability allows him to move 2 squares in addition to the moves or interacts of the card if he is at least 2 squares away from any other hero. - Q: Will there be Scenarios that can be played separately from the campaign?
A: Yes. These will be part of the Training Manual. These will let you try out different heroes or to show off the game to family and friends. - Q: Can you run two campaign games simultaneously so you can play with two different groups of people?
A: Yes, but you will need to use different characters in each AND take notes as to where you are in each campaign. You also will need to keep track of which “loot cards” you have obtained. - Q: Do you move the turn track marker after each players turn or only after all the players have had a turn?
A: The turn track is like a timer. You move its marker after each player’s turn ends. Ref: rulebook page 17 item c) - Q: Clarify hero character Memnon special ability
A1: Memnon must “pay” one focus for each damage card that slides to the left during a REST action (including the “free” Rest action at the end of every turn). If Memnon has no focus available, the damage card cannot be slid over, and this might cause other cards higher on the cooldown track to also not be able to slide to the left as well (because that unmoved damage card is blocking them).
A2: Memnon has one permanent shield. Whenever damage hits him, that permanent shield blocks the first damage, so always subtract 1 from the amount of damage he takes. - Q: Hacking tokens. If I draw a red, a purple and a white, I could put the purple back in the bag and keep the red and the white. On my next action, if I draw another white, does that cancel everything and all tokens go back into the bag?
A: No. You must draw two white tokens from the bag in the same action for it to trigger the cancelling and returning all tokens pulled on that action. And also note that if you do draw two white tokens in one action, you only return all the tokens pulled from the bag in THAT action. If there were tokens there before your action began, those remain there. Ref: rulebook page 26 3rd bullet point under the 2nd bullet point - Q: Clarify Hiro’s Action Card: BMS Device
A: When you play this card you also roll 3 dice. Once on your cooldown track it is an ongoing effect. The action description is: “At the end of your turn, before the free rest action, move an ally 2 squares; the ally also gains 1 focus.” Note: the ally must be in Hiro’s Line Of Sight. You only roll the dice when the card is played, not during its ongoing effect. - Q: Can I use the boost for an Action Card after I roll my dice?
A: No. You must use the boost before rolling the dice. Ref: rulebook page 18 final bullet point under 1. - Q: Unconscious? I just got my 4th Damage card and placed it in my cool down track available slot (now I have all four cool down slots with damage cards in them). Does this make my character unconscious?
A: No! Your character goes unconscious when you are instructed to draw a damage card and the card you draw specifies a slot that already has a damage card in it AND all higher numbered slots also have damage cards in them… thus you are not able to play the damage card you just drew. That card is discarded and your character goes unconscious. Ref: rulebook page 40 item 2 under Placing Damage Cards. - Q: Walls: Are all the various lines on the maps treated just like walls? Like white dashed lines, black & yellow lines and long yellow bars?
A: No! Walls are black and/or red lines. Everything else is artwork to make the maps look realistic (and cool). Also note that the doors you add to maps act like a wall until opened, and a blocked entrance tile also acts like a wall. Ref: rulebook bottom of page 47. - Q: Companions: How are companions used (once you have a companion card)?
A: The companion card is just placed next to the character sheet of one of the heroes and used whenever applicable. They are not associated with action cards, so no playing in cooldown or anything like that. - Q: Adding to a map during Mission Update: What do I do when the update tells me to place a standee on a square that is already occupied?
A: Move the existing object to any adjacent square (your choice), then place the new object as directed. Ref: Rulebook page 13 - Q: Moving an object: If the mission says that I can move an object, can I drag it along with me on the square on my side?
A: No. You can push it one square ahead of you as you move in any direction (including diagonal) during your movement. You also can choose to pull it one square behind you as you move. In both cases, it must be in the same forward or backward ‘line of movement”. Ref: rulebook page 44 - Q: Vera’s Jet Pack: clarify the blue boost: “Push all adjacent enemies 2 squares away from you”
A: This can be done only at the starting or ending square (ie, not any of the squares while moving) - Q: My Action card tells me to move the card 1 slot to the right on the cooldown track, but there already is another card there. Do I then keep moving (sliding) it to the right until there is an empty slot (or off the track and back into my hand)?
A: No. When instructed to move a card one slot (right or left) and that slot is already occupied, then you do not move (slide) the card at all (it is blocked).
PLUS: This means that if drawing a damage card and it says to move a damage card to the right and all slots to the right are already filled with damage cards, nothing is moved. - Clarify: areas that “can be jumped”
A: If the “triggers/conditions” of a mission indicate an area that can be “jumped”, only an Action card that has a subcategory of “jump” can do the jump. For example, a move of 3 squares will not just jump over the area. Only 3 heroes have a “jump” Action card:- Talya: Jump and Run is an Ability (Jump) card
- Sigyn: Enhanced Mech Legs is an Ability (Jump) card
- Vera: Jet Pack is a Gear (Jump) card
- Clarify: What can be “jumped” (using a “jump” Action card):
A: When moving via a “jump” Action card, your hero can jump over enemies, allies, barrels, crates, rubble and most anything else. But you cannot jump over a closed door or a wall. - Q: What are some of the tiles included with the game? They are not being used yet.
A: Don’t worry about some of the tiles that are larger than 1 square. They will be used later in the game and it would spoilers to let you know how:) - Clarify Mission C34: Rocks push EVERYTHING (even a console).
- Q: Can Vera (and the other 2 heroes who can “jump”) jump over rocks?
A: Not if there is a red X in the middle of the rock tile to signify it is a BLOCKED path, but regular rocks, yes. - Q: What happens if an enemy is completely blocked from reaching it’s target (a hero)?
A: The enemy will move as close as possible to its target and end its move action. Ref: rulebook page 43 - Mission C32 Clarification: The enemy cannot see through a forest square (it blocks their line of sight), but will still move towards the player regardless of where they are.
- Q: What happens (typically by a weapon) when an enemy (or hero) is pushed and would go right off the map?
A: They do not go off the map, but stop on the last square right on the edge of the map. Some weapons state that when pushed, if something stops you then you take damage. If the map has a wall at that edge it would then cause the “damage due to being stopped”. If there is no wall on the edge of the map, then there would be no damage taken. Ref: rulebook page 46. Len’s Note: Some maps (such as map 007) have areas of “jungle/bramble” strewn about across the map and each has a red line around them (ie, equivalent to a wall). If you are pushed to the edge of such a map and would hit one of those types of areas, Len considers it to be a “wall” and damage would be taken. Example the top right corner of map 007 has the “jungle/bramble” artwork so it would be blocking. - Clarify Mission C9AB – Q: Since the Siege Breakers respawn, do we have to destroy them all TWICE? A: No. You only need to destroy the number of them that matches your team size (TS). Example: With a two player game, TS=2. Have two Siege Breakers explode within the server room (the same one after respawning can count as the second explosion) – success is met by any Siege Breaker exploding in the server room TS times.
- Q: What do I do if I am instructed to place (or spawn / respawn) an enemy and there already is an object (or a hero or another enemy) in the square that it is supposed to go? (ie, the square is blocked)
A: The object in that square must be moved to make room for the newly spawned enemy. The players move the current hero, enemy or object blocking the square to an adjacent square they decide on. Ref: rulebook page 13 under the map. - Q: Can I just use the “boost” for an Action card played and ignore the main action itself?
A: Yes! (confirmed with the game designer) Ref: rulebook page 18 which states, “You do not have to use some or all the die results, just like you do not have to perform theaction itself; you can use the bonuses and/or roll the dice purely for their values.” - Q: Does a permanent shield deflect damage as you walk through areas on some maps that have squares that damage you when you walk on that square?
A: YES! Permanent shields are perfect for missions with those kinds of obstacles! [Ref: answer from the developer] - Q: Laelia’s special ability let’s her once per turn to ignore a damage card that would cause her to go unconscious. At the end of a mission, if Laelia is adjacent to the door to the ship and she must be in the ship when the mission ends or get a scar, but it not her turn (and she will not get another turn before the mission timer hits ZERO) can another hero on their turn (before the timer hits zero) play an action card that pushes Laelia into the ship? She does hit a wall inside the ship and takes damage for that. What if she has no shields to deflect the damage but does have cool down track slot 4 empty. If she takes 2 damage and then draws two damage cards that both go into slot 4, can she use her special ability to ignore going unconscious with that last damage card?
A: Laelia’s special ability only kicks in during the enemy’s turn, not during a fellow hero’s turn (who just pushed her into the wall). If she draw 2 damage cards and both were to be placed on slot 4, her special ability would not prevent her going unconscious. - Q: Rolling a +1/move for a hacking action card (such as Comm Device for Adryel which lets you interact for [2] … let’s say you really need to get that hacking completed (via 3 tokens of the same color…
A) Can you first draw the 2 tokens as specified on the card itself BEFORE deciding if you want to use the +1 on the die (rather than the move)?
B) Can you say you are using the +1 on the die, but you pull exactly the right colors via the 2 specified by the card… can you then change to use the move instead since you no longer need the +1?
ANSWER: this is the procedure you follow:
Play action card -> Roll dice -> Choose result on dice -> Execute action
You choose what result you will use from the die result BEFORE starting to execute the action. - Q: Do I put all the interact tokens back into the draw bag before starting a mission update?
A: No. Everything remains the same if a mission finishes with instructions to go to a mission update! Do not reset anything, including the draw bag used for interaction with doors and terminals. - Q: When the objective is to get the commander adjacent to the POI marker, does that mean the command must end the action there, or if the commander has more movement available can he move to adjacent and continue moving for that action? [ref: mission C2 Update 1A]
A: The check for mission success is AFTER the players turn (just before the enemies turn), so the commander has to be adjacent to the POI then (had been adjacent is not enough). - Q: Gia’s Blade Fury action card does damage to each enemy adjacent to it as it moves but there is no square brackets for movement?
A: Correct. Movement will only be via the FOUR dice that the card has you roll – you need to roll a movement icon on a die in order to move and do damage as you move.
Enemy Behavior:
- Q: If there are three enemies (of the same color: Red or Yellow) do they all activate, or only the two with the lowest initiative (numbers)?
A: No matter how many enemies there are of one color, only the two with the lowest initiative numbers activate. [note: an Enemy Behavior Card (ECB) or a Campaign Mission can specifically state otherwise] Ref: rulebook page 34 - Q: Can enemies open closed/locked doors?
A: No. They also do not attack explosives. Ref: rulebook page 34 2nd last * - Q: Enemy Stats: X Shields?
A: The X means that their shields will vary based on the mission. - Q: Enemy Stats: Damage as a die icon?
A: Roll 1 die (for each die icon). Add the results to get the amount of damage (counting +1 and +2 results) for that attack. - Q: Enemy Stats: Shields as a die icon?
A: Roll 1 die (for each die icon). The number of shields in the die results specifies how many shields the enemy has for that attack. - Q: After an enemy moves and is supposed to attack “same or nearest“, how do we know which?
A: Same trumps nearest. Ref: rulebook page 38 - Q: What does the red movement icon on an enemy damage stat mean? (ex: Stone Boar)
A: Count how many squares that enemy moves before attacking. The number of squares moved equals the number of damage dealt. Likely its icon will be changed to “X” to be more clear. - Clarification of “inaccessible enemy” bullet point at the bottom of page 34 of the rulebook. Perhaps it could be worded like this:
“Inaccessible enemies (e.g. sealed off by red lines like walls, doors or blocked paths) are treated as not being there. They will not activate unless specifically stated so.” - Clarify Enemy Behavior Card (EBC) “Swarming Attack”:
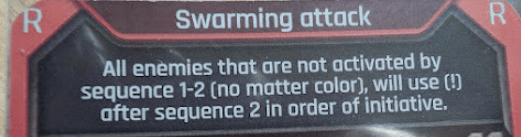
Think SWARMING! Any enemy that did not get activated by the normal current color lowest two initiatives process DOES get activated with the (!) sequence at the bottom of the card! Yes, that includes Red, Yellow AND Orange enemies that are on the map! - Clarification: If a damage card states to slide a damage card to the right and there is another card there, then ignore that instruction. Ref: rulebook pg 41 example A2. This also should apply to an instruction to move a damage card to the left – if there is a card there, then ignore that instruction (example: Ayeni Inaru companion card action)
- Q: if you trigger a change to the EBC (Enemy Behavior Card) during your turn, do you change the EBC immediately (ie, before doing the enemies turn) or do you finish the full turn using the current EBC and after the enemies turn change the EBC?
A: if the trigger happens during your turn (ie, not during the enemies turn), then you change the EBC immediately and the enemies turn uses the new EBC.
